
Friday, October 28, 2011
My New Obsession
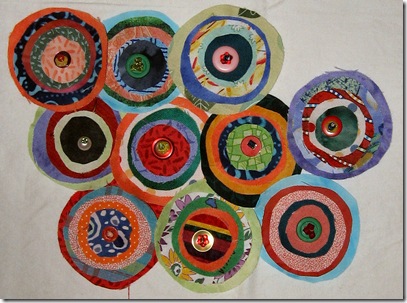
I was captivated by Cynthia Ann Dubbers article in the most recent issue of Cloth, Paper Scissors Gift magazine. The project she presented is Fabric Forest. She had done several topiary trees, but the one I liked most was this one. I have lots of scraps and decided to try the project. Each 2 1/2 inch circle is made of five pieces of fabric and secured with a button. I knew I wouldn’t have the patience to fray the edges as she had done, so I decided to add texture with beads. I can’t stop cutting and stacking circles and deciding how to bead them. I don’t know where this project is going, but I’m finding it delightfully fun. Part of the enjoyment is remembering the projects that gave me such wonderful scraps. I have to find a way to include a scrap from my older daughter’s 7th grade shorts, and the vest with the feather print I made for my other daughter, and the red pants my husband wore out.


Tuesday, October 4, 2011
Meet Alyssa
On the way to the Grand Canyon, we stopped in Fredonia, Utah at the Gas, Beer, Guns and Ammo Service station and met Alyssa. She had set up a stand selling pillowcases and toddler skirts she had made. I couldn’t resist and made a purchase. She said her grandmother was teaching her to sew and that they drove 80 miles to St. George, Utah to buy fabric at JoAnn’s.

Thursday, September 29, 2011
petroglyphs
Tom and I are on a western states road trip. Today we were at Arches National Park near Moab, Utah. These are the first petroglyphs we have seen. I think in addition to the horses, riders and sheep there are at least two dogs in the scene. I usually post at least one photo a day on Facebook, and a different one on Twitter. FB is Susan Cobb Clayton, Twitter is defling01.

Monday, September 26, 2011
What I’m reading
On a recent trip, we listened to two Michael Connelly books, The Closers and The Brass Verdict. Good listening, but not memorable
The Greater Journey by David McCullough was a wonderful book. It’s long, took me nearly a month to read it, but I truly enjoyed it. It is subtitled, Americans in Paris, and documents the influx of Americans to Paris between 1830 and 1900. I found the chapters on the siege of Paris at the end of the Franco Prussian war gripping, and the chapters on Augustus St. Gaudens fascinating. Recommend for artists, Francophiles and history lovers.
Tomatoland by Barry Estabrook Estabrook is a journalist who writes mostly for Culinary publications. In this book he begins by searching for what happened to the taste of tomatoes. His search takes him to the Andes where the first tomatoes were found, to the hostile infertile fields of Florida, to laboratories and to an old school farmer in Pennsylvania. Much of the book focuses on the plight of Florida migrant workers. Recommend
Partitions by Amit Majmudar is one of those rare and beautiful books that is a treasure to read. It’s just over 200 pages, but each page is poetry set in prose. Every word counts. It is about the displacement of four people during the civil war in India following the partition of India and Pakistan in 1947. The travelers are an ageing doctor, twin five year old boys and a sixteen year old girl. Their journeys are separate, but strangely connected. It’s the best book I’ve read in a long time.
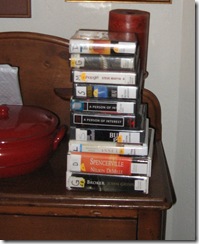
We are going to be taking a road trip soon, here’s the stash of audio books we are taking with us.
The Greater Journey by David McCullough was a wonderful book. It’s long, took me nearly a month to read it, but I truly enjoyed it. It is subtitled, Americans in Paris, and documents the influx of Americans to Paris between 1830 and 1900. I found the chapters on the siege of Paris at the end of the Franco Prussian war gripping, and the chapters on Augustus St. Gaudens fascinating. Recommend for artists, Francophiles and history lovers.
Tomatoland by Barry Estabrook Estabrook is a journalist who writes mostly for Culinary publications. In this book he begins by searching for what happened to the taste of tomatoes. His search takes him to the Andes where the first tomatoes were found, to the hostile infertile fields of Florida, to laboratories and to an old school farmer in Pennsylvania. Much of the book focuses on the plight of Florida migrant workers. Recommend
Partitions by Amit Majmudar is one of those rare and beautiful books that is a treasure to read. It’s just over 200 pages, but each page is poetry set in prose. Every word counts. It is about the displacement of four people during the civil war in India following the partition of India and Pakistan in 1947. The travelers are an ageing doctor, twin five year old boys and a sixteen year old girl. Their journeys are separate, but strangely connected. It’s the best book I’ve read in a long time.

We are going to be taking a road trip soon, here’s the stash of audio books we are taking with us.
Friday, September 23, 2011
Fabric painting
I continue to be fascinated by painting on fabric. Recently I came upon a post about the transformation of an knock-off Eames chair. I was intrigued by the look and wondered if I could do it in fabric.

First I tried the technique described in the Martha Stewart tutorial on paper.

Then I tried it on canvas fabric. Because both paper and fabric are more porous than wood, I did not add water to the paint and glaze mix.

There is something pleasing about the subtlety of the paint on the fabric, but I if I were going to do a major project with this technique, I’d have to explore using house paints and the kind of acrylic glaze used by faux finish painters. Fabric is much more porous than wood or paper, so it used a lot of paint and glaze.
That said, I’m happy with the durability of latex house paint on fabric. I washed my sample in hot water with detergent and dried it in the dryer. There was some very slight fading, but not enough to warrant using expensive fabric paints or fabric medium additive.
Just another technique for the toolbox.
First I tried the technique described in the Martha Stewart tutorial on paper.

Then I tried it on canvas fabric. Because both paper and fabric are more porous than wood, I did not add water to the paint and glaze mix.

There is something pleasing about the subtlety of the paint on the fabric, but I if I were going to do a major project with this technique, I’d have to explore using house paints and the kind of acrylic glaze used by faux finish painters. Fabric is much more porous than wood or paper, so it used a lot of paint and glaze.
That said, I’m happy with the durability of latex house paint on fabric. I washed my sample in hot water with detergent and dried it in the dryer. There was some very slight fading, but not enough to warrant using expensive fabric paints or fabric medium additive.
Just another technique for the toolbox.
Tuesday, September 20, 2011
Design on a Nickel—Finishing the pillows
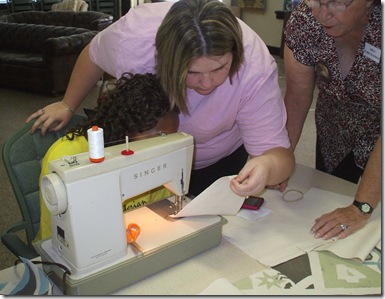
Aft the pillow tops dried over night, a group of seamstresses came in to teach them to use a sewing machine, turn and stuff the pillows. I had in mind that they would hand stitch the opening closes, but they quickly overruled me and stitched them closed
Here’s one of the boys using my grandmother’s featherweight



After washing old pillows in hot water, we harvested the filling to stuff the new ones.

TA DA!

Just in case you were wondering about the durability of house paint on fabric, the striped pillow in the photo above was painted on canvas prepared with washing and drying. I did not use any fabric medium, and after a few days, I washed it in the machine in hot water and dried it in the dryer. No appreciable difference in color, and the paint is supple. Amazing.

The final delivery of furniture comes this week, more pictures to come.
Here’s one of the boys using my grandmother’s featherweight


After washing old pillows in hot water, we harvested the filling to stuff the new ones.

TA DA!

Just in case you were wondering about the durability of house paint on fabric, the striped pillow in the photo above was painted on canvas prepared with washing and drying. I did not use any fabric medium, and after a few days, I washed it in the machine in hot water and dried it in the dryer. No appreciable difference in color, and the paint is supple. Amazing.


The final delivery of furniture comes this week, more pictures to come.
Saturday, September 17, 2011
Design on a Nickel—Painting pillows
To prepare the fabric for painting, I purchased natural canvas fabric at JoAnn’s. It’s with the canvas duck, but it does not have the same finish as the colored duck. washed it in hot water with detergent and damp dried it in the dryer, then finished drying it on a clothes rack. After ironing it I cut the fabric in 14” squares and 18” squares.
To introduce the painting to the participants, I had them work on 5” squares using freezer paper, masking tape and rubber stamps. We used the latex house paint left over from painting the room and furniture. They very quickly got the hang of it.


Here are some of their artwork. We let them dry over night


To introduce the painting to the participants, I had them work on 5” squares using freezer paper, masking tape and rubber stamps. We used the latex house paint left over from painting the room and furniture. They very quickly got the hang of it.


Here are some of their artwork. We let them dry over night


Wednesday, September 14, 2011
Design on a Nickel—Scraping and Painting
The young people’s event at church this past weekend was a big success. One of them is an aspiring chef and we started out with a wonderful dinner prepared by Chris and his sou chef TaShai. Yum!
Then they got busy scraping the peeling UV film off the windows, and painting some of the wood furniture.


The coffee table for the room started out like this, a plywood topped activity table.
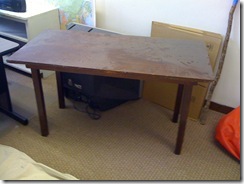
The legs were cut off so it’s 17” high, and it was sanded and painted. Later on, some decorative painting techniques will be applied.

After dinner we moved on to painting canvas to make pillows.
Then they got busy scraping the peeling UV film off the windows, and painting some of the wood furniture.


The coffee table for the room started out like this, a plywood topped activity table.

The legs were cut off so it’s 17” high, and it was sanded and painted. Later on, some decorative painting techniques will be applied.

After dinner we moved on to painting canvas to make pillows.
Friday, September 9, 2011
Sewing with my sister
A couple of years before my mother died, she bought my two sisters and me fabric to make kimonos. Last year, Tracy finished them just in time for a family reunion. This week, Tracy wanted to make placemats out of the remaining scraps. They turned out beautifully.
Here they are in process paired with her china and some of the napkins she embellished.

She made some with yellow borders, some with green, and some with purple borders. Here are the green ones with their binding on.

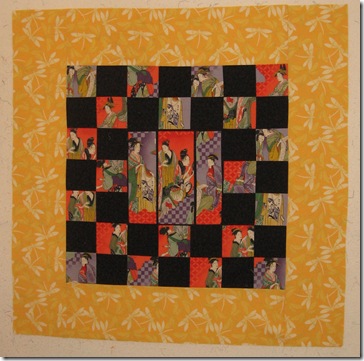
There’s still leftover fabric, and she got inspired and made her first quilt. She’s been bitten badly. I’m meeting her at a sewing store next week to shop for a machine.
Here’s Tracy’s first completed top. I think it is fantastic, plus it’s flat and the corners are square. Quite a feat for a beginning quilter.
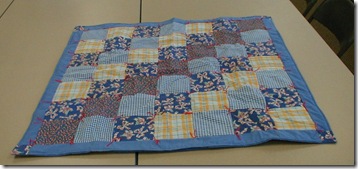
Here’s a photo of my first quilt. It was lumpy and crooked. In my defense I made it under the guidance of a hand quilters guild who cut their squares out by marking with soap slivers around a cardboard template. They were dear women, mostly over 70 who sewed and quilted like they had in the 40's. They opened their fabric cupboards to me and helped me finish it by hand tying. It’s pretty pitiful. Rotary cutters, mats and rulers do wonders for getting a quilt that’s flat and straight. The quilt went to a nursing home patient to keep her warm during Indiana’s cold winters.
Here they are in process paired with her china and some of the napkins she embellished.

She made some with yellow borders, some with green, and some with purple borders. Here are the green ones with their binding on.

There’s still leftover fabric, and she got inspired and made her first quilt. She’s been bitten badly. I’m meeting her at a sewing store next week to shop for a machine.
Here’s Tracy’s first completed top. I think it is fantastic, plus it’s flat and the corners are square. Quite a feat for a beginning quilter.

Here’s a photo of my first quilt. It was lumpy and crooked. In my defense I made it under the guidance of a hand quilters guild who cut their squares out by marking with soap slivers around a cardboard template. They were dear women, mostly over 70 who sewed and quilted like they had in the 40's. They opened their fabric cupboards to me and helped me finish it by hand tying. It’s pretty pitiful. Rotary cutters, mats and rulers do wonders for getting a quilt that’s flat and straight. The quilt went to a nursing home patient to keep her warm during Indiana’s cold winters.

Saturday, August 27, 2011
Design on a Nickel Part—Getting started
The young people at our church have launched a project to refresh and renew their meeting space. With a grant from the congregation we purchased a 7 piece sectional sofa. We also had money for fabric and labor to recover a couple of swivel rockers and purchase window shades. The remainder of the furnishings in the room will be rehabbed. Last weekend a group painted the room, sanded chairs, a bookcase and a table.
The guys took to painting the room like pros; the girls opted for power tools and ran sanders all morning in the room next door. Putting a first coat on the furniture occupied most of the afternoon. The table was an activity table from one of our children's classrooms that had seen better days. Tom cut the legs off and it’s ready to be a coffee table.


The room is now painted, and window shades are hung. On the next workday, they will put another coat of paint on the furniture, and if there’s time start on the pillow project.
Inspired by a number of web posts, I experimented with painting canvas with the paint left over from the project.

The larger pillow top has house paint mixed with fabric medium, the smaller sample is paint right out of the can. After it dries, I’ll see if there is a difference in the hand and durability of the two samples. Web posts are divided as to which method is better.
To make these pillows, I cut wavy shapes out of freezer paper and ironed them on the canvas. After painting, I peeled the strips away.
If this paint holds up on canvas, we have some retro rattan chairs taking up space in an unused room that could have their cushions painted. Like this or this
more later…
The guys took to painting the room like pros; the girls opted for power tools and ran sanders all morning in the room next door. Putting a first coat on the furniture occupied most of the afternoon. The table was an activity table from one of our children's classrooms that had seen better days. Tom cut the legs off and it’s ready to be a coffee table.


The room is now painted, and window shades are hung. On the next workday, they will put another coat of paint on the furniture, and if there’s time start on the pillow project.
Inspired by a number of web posts, I experimented with painting canvas with the paint left over from the project.

The larger pillow top has house paint mixed with fabric medium, the smaller sample is paint right out of the can. After it dries, I’ll see if there is a difference in the hand and durability of the two samples. Web posts are divided as to which method is better.
To make these pillows, I cut wavy shapes out of freezer paper and ironed them on the canvas. After painting, I peeled the strips away.
If this paint holds up on canvas, we have some retro rattan chairs taking up space in an unused room that could have their cushions painted. Like this or this
more later…
Monday, July 25, 2011
What I’m Reading
Patron Saint of Liars—Ann Patchett
I think this was probably her first published novel, written when she was still in her 20’s. It’s set in the 60’s, near Owensboro, Kentucky, and is about the people who live and work in a home for pregnant women who will be giving their children up for adoption. Patchett shines in her ability to give life to her characters. Good read.
Cleopatra—Stacy Schiff
This was not an easy book to get into. The author is primarily a historian who takes pains to use sources as close to the original as possible, but there are no sources from Cleopatra's contemporaries so there is a lot of speculation and reference to the variety of sources. I received an overdue notice from the library when I was on page 121. Oh well.
The Thoughtful Dresser--Linda Grant
I read Grant's novel, The Clothes on Their Backs several weeks ago and while it was good, this one is much better. the subtitle of the book is The Art of Adornment, the Pleasures of Shopping, and Why Clothes Matter. Lest you think yourself exempt from the frivolity of fashion and shopping, her multitudes of examples leave very few women out of the equation. Recommend, for women of all ages.
We Had it So Good Linda Grant
I'm on a Linda Grant kick, in fact, this was the book I heard about that got me started looking for her books. It's a multi-generational novel with good character development and very good writing. It spans the years from the mid 1950's to the present day. When I read the last page, my word for it was depressing. Enough of that, move on. If you want a good Linda Grant book, read The Thoughtful Dresser.
In the Sanctuary of Outcasts--Neil White
This was the book selected for incoming freshmen at Davidson College to read for orientation discussion groups. The author was convicted of bank fraud and sentenced to a minimum security federal prison in Carville, Louisiana. During the time he served, the prison grounds and buildings also housed the last isolated colony of those disfigured by leprosy. The mix of patients, guards, inmates, provides for great reading. It is fascinating, recommend.
I think this was probably her first published novel, written when she was still in her 20’s. It’s set in the 60’s, near Owensboro, Kentucky, and is about the people who live and work in a home for pregnant women who will be giving their children up for adoption. Patchett shines in her ability to give life to her characters. Good read.
Cleopatra—Stacy Schiff
This was not an easy book to get into. The author is primarily a historian who takes pains to use sources as close to the original as possible, but there are no sources from Cleopatra's contemporaries so there is a lot of speculation and reference to the variety of sources. I received an overdue notice from the library when I was on page 121. Oh well.
The Thoughtful Dresser--Linda Grant
I read Grant's novel, The Clothes on Their Backs several weeks ago and while it was good, this one is much better. the subtitle of the book is The Art of Adornment, the Pleasures of Shopping, and Why Clothes Matter. Lest you think yourself exempt from the frivolity of fashion and shopping, her multitudes of examples leave very few women out of the equation. Recommend, for women of all ages.
We Had it So Good Linda Grant
I'm on a Linda Grant kick, in fact, this was the book I heard about that got me started looking for her books. It's a multi-generational novel with good character development and very good writing. It spans the years from the mid 1950's to the present day. When I read the last page, my word for it was depressing. Enough of that, move on. If you want a good Linda Grant book, read The Thoughtful Dresser.
In the Sanctuary of Outcasts--Neil White
This was the book selected for incoming freshmen at Davidson College to read for orientation discussion groups. The author was convicted of bank fraud and sentenced to a minimum security federal prison in Carville, Louisiana. During the time he served, the prison grounds and buildings also housed the last isolated colony of those disfigured by leprosy. The mix of patients, guards, inmates, provides for great reading. It is fascinating, recommend.
Sunday, July 24, 2011
Paper Towel Purse
I’m back in the studio making things that have little practical purpose, but having fun in the process. I’ve been making samples for the fabric painting workshop I’ll be doing with teens in a few weeks. When I get out my paints I have a multi-step process to cleaning brushes.
1. Paint off all excess paint onto sheets of paper. I save the paper sheets for future projects.
2. Squeeze out any remaining paint with paper towels.
3. Swab the brush in a bucket of brush cleaner. I use The Masters brush cleaner. I have been using the same tub for over a year, and I’m generous with it. It looks like it will last another year or two. Again use a paper towel to squeeze out the soap and paint
4. Finally rinse in a bucket or under running water. Very little paint goes down my drain. I’d rather throw paper towels in the landfill than pour wet paint into the water system.
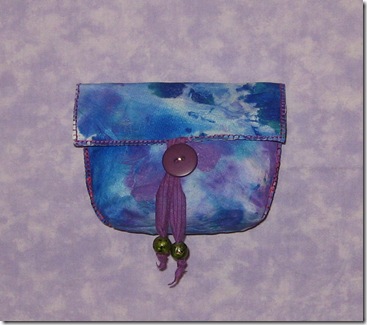
The end result is that I get a lot of painted paper towels. I usually let them dry and throw them out, but one from last night caught my eye. Today, I bonded the paper towel to a piece of fabric using this technique as described in Kelli Nina Perkins book Stitch Alchemy.
The towel was a little bare in some places, so I added a few drops of blue ink and let it dry in the sun. I made a very simple clutch purse, boxed the corners and added a button and ribbon closure with beads. I bought nothing for this project and didn’t take a lot time thinking about what color button, beads, thread, etc.
What will I do with it? Keep it awhile and admire it. It’s only about 4”x5”, so I’m being generous to call it a purse.
1. Paint off all excess paint onto sheets of paper. I save the paper sheets for future projects.
2. Squeeze out any remaining paint with paper towels.
3. Swab the brush in a bucket of brush cleaner. I use The Masters brush cleaner. I have been using the same tub for over a year, and I’m generous with it. It looks like it will last another year or two. Again use a paper towel to squeeze out the soap and paint
4. Finally rinse in a bucket or under running water. Very little paint goes down my drain. I’d rather throw paper towels in the landfill than pour wet paint into the water system.
The end result is that I get a lot of painted paper towels. I usually let them dry and throw them out, but one from last night caught my eye. Today, I bonded the paper towel to a piece of fabric using this technique as described in Kelli Nina Perkins book Stitch Alchemy.
The towel was a little bare in some places, so I added a few drops of blue ink and let it dry in the sun. I made a very simple clutch purse, boxed the corners and added a button and ribbon closure with beads. I bought nothing for this project and didn’t take a lot time thinking about what color button, beads, thread, etc.
What will I do with it? Keep it awhile and admire it. It’s only about 4”x5”, so I’m being generous to call it a purse.

Friday, July 22, 2011
Design on a Nickel
All it took was a project to get me back in the studio again. The young people at our church meet in a room that needs a face lift. One of the easiest and quickest ways is to do this is with pillows. So we’re having a fabric painting workshop. We’re a little short on cash, so we’re not designing on a dime, we’re designing on a nickel.
Here’s the challenge
Teach teens and 20 somethings how to cut, sew, stuff canvas pillows. They will have varying degrees of interest and skills. The desired outcome is to have them make three pillows, two for their meeting space at the church, and one to take home. Some of them may only want to make one pillow, others may want to make as many as time allows.
Fabric—I have unbleached cotton canvas which I have washed to remove the finish that inhibits paint. I’ll pre-cut the pillow tops and backs. They will need to mark seam allowances with rulers and pencils.
Paint—Between my personal stash and the supplies at church we have lots. I’d like to limit the color palette so the room has a cohesive look.
Design and Application—I want to keep it simple, so we’ll use masking tape freezer paper and foam stamps. I’ll need to have some shapes printed on freezer paper ready to cut out.
Stuffing—Since this is design on a nickel, we will not be using purchased pillow forms or even fiberfill. We will cut up old towels and t-shirts and use that for stuffing. The end product might be a bit lumpy, but we’re using canvas, so I don’t think it will be too noticeable.
Sewing—I have two sewing machines I can bring in for the workshop and after the paint dries, we’ll stitch front and back together, stuff and close. For those who are interested, I’ll show them how they can sew the pillow completely by hand.
here are some samples

Masking tape grid

Stamped letters with splatter paint background

Simple rubber stamp shapes

Star shape embellished with gold paint applied with pencil eraser

6” stencils lettering, notice blobs on right side of blue J. Need to figure out some ways to embellish those inevitable mistakes

Freezer paper waves. I think I’ll try adding some text on the white spaces between the stripes, or maybe only on the stripes.
I have some more experimenting to do. I don’t know if it would be too stiff for a pillow, but I’m going to prep some canvas with gesso, and add text with chunky black markers.
This is going to be fun figuring out.
Friday, July 1, 2011
Another day in the kitchen
Today Franky and I tried another recipe from the Harry Potter cookbook. It was a recipe for Harry’s first birthday cake, you know, the one baked for him by Hagrid when he was 11 years old.
First we assembled the dry ingredients and prepared to mix

cakes out of the oven

Mixing up the glaze. We tried smashing the chocolate squares with a mallet, but simply cutting them with a knife worked better.

After making the frosting, we chilled it for awhile, then began to frost the cake

Now the green decorative frosting. We made do with a Ziploc bag instead of a pastry bag and tip. I liked the free form application

Ready to eat!

I hadn’t made a cake for awhile, but it is so much fun to make one from scratch. This one had a lot of steps, but it turned to look exactly like a cake Hagrid would have baked.
Fun Day!
Subscribe to:
Posts (Atom)


